

Integration Overview
Integration
Shopify Admin - Order Details
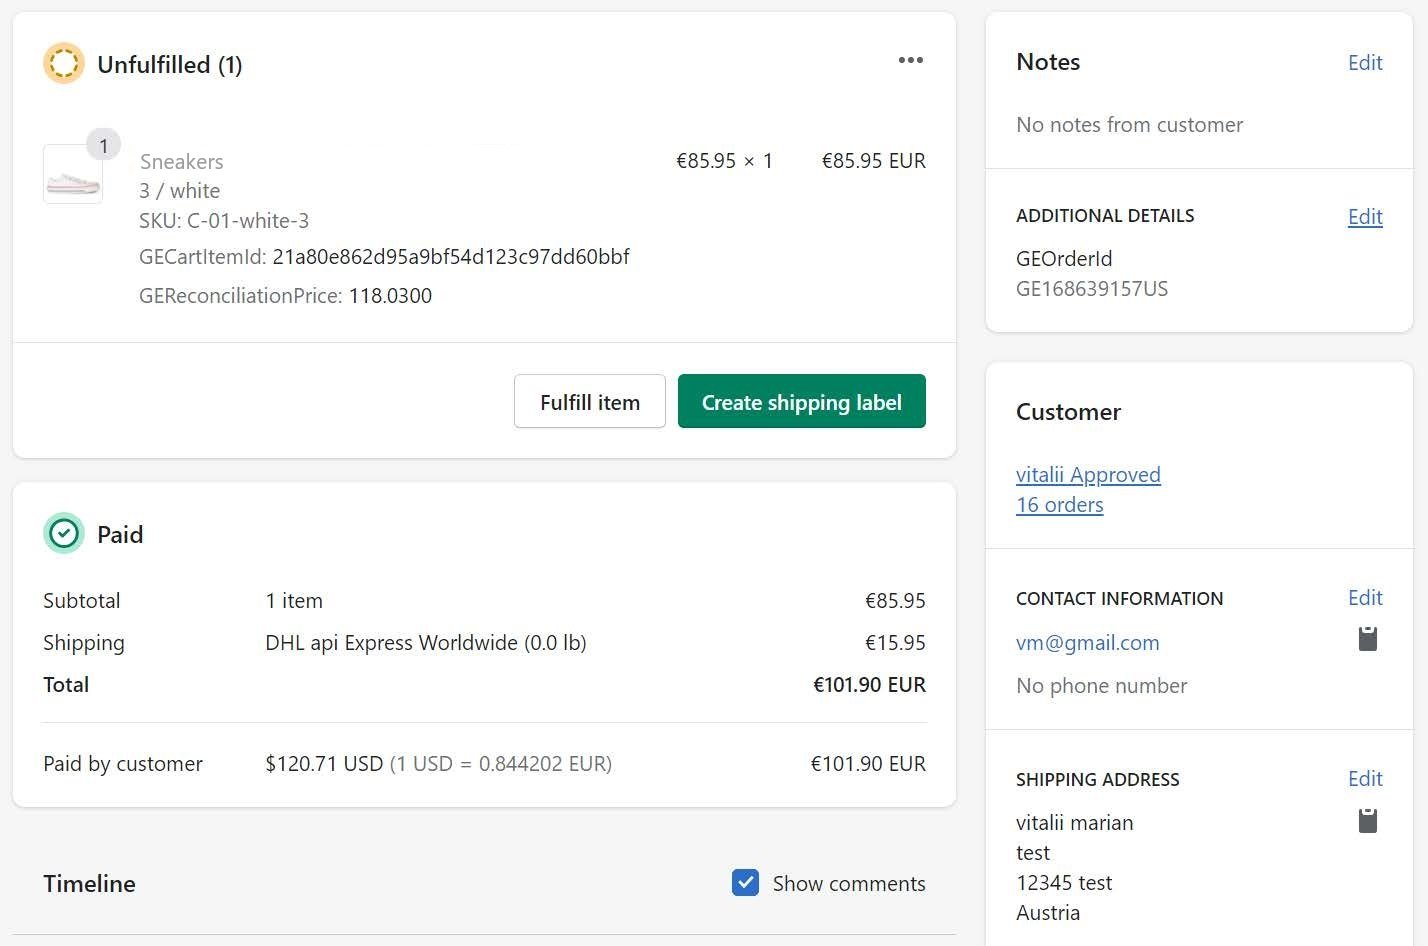
✓ Order created as per customer transaction✓ Custom properties: Global-e order id✓ “Global-e Carrier Service” shipping source with the actual shipper✓ Global-e payment gateway✓ Fraud approval order tag✓ End-customer billing and shipping
Integration Overview: With Global‑e

Limitations
- Available on Shopify Advanced and Plus plans.
- Refund an order using a gift card only in Shopify Plus plan.
Integration Details
Before beginning the setup, ensure the following conditions are met:- A Shopify Sandbox is available for pilot testing and rollout preparation.
- Fraud approval for export from Shopify must be fulfilled based on the order tag, not the “PAID” status.
-
Install the following Global‑e Apps:
- CrossBorder app
- Payment app
-
Set up Alternative Payment Methods: Enable Shopify Payments.
Scripts tags and theme includes (e.g. checkout) automatically added. This only applies to checkout for headless setups
Downstream Flow Behind Shopify
Order Flow Adjustments
Update Product Details from Shopify to Global-e
This section described the Global-e flow for updating product details from Shopify to Global-e. To update product details from Shopify to Global-e:-
Each time a product is added or updated in Shopify, Global-e gets the
ProductUpdatedwebhook from Shopify. - Global-e writes the message to Kafka.
- A Global-e service reads the message from Kafka.
-
Kafka calls the following Shopify APIs:
GraphGetInventoryItemsGetProductService -
For each variant, Global-e creates a product based on Webhook Data (
apiProduct). -
After validation, the Global-e service calls the internal Global-e API
SaveProductListAPI(updatedProductsis the list of variants that was just created).
Shopify-to-Global-e Field Mapping
When performing an update, Global-e reviews the following fields. This process applies to all products.Integration Summary
- Global‑e creates an account for the merchant in the Global‑e system.
- Global‑e requests user access and permissions to the merchant’s site.
- The merchant installs the Global-e CrossBorder application.
- The merchant installs the Global-e Payment application.
- Optional: The merchant installs the required 3rd party applications (geolocation, search, analytics, and more).
- The merchant performs the required website adjustments (country selector, geolocation, and more).
- The merchant and Global-e gradually enable Global-e countries, first by validating the functionality of a few operated countries, and then adding the remaining countries.
Additional Integration Features
Analytics
Use the Shopify checkout object to map Shopify data to any Analytics party. Example of GA4 MappingMarketing Feeds (Liquid Storefronts)
Domestic Feeds To prevent price mismatches between the feed and the prices appearing on the storefront due to automatic geo-IP detection and redirection features, you must update the product links in their domestic feeds. All domestic product links should append the country parameter with the 2-letter country code of their domestic market. Example: For a US merchant: https://www.mystore.com/products/red-shirt?country=US Failure to do this may result in warnings from Google, after which they will prevent your from submitting marketing feeds. International feeds There are 3 main methods you can use to generate an international Marketing feed:- Using supported Shopify apps (recommended).
- Manually generating the feed yourself by writing a custom script or program, or creating an Excel sheet.
- Using a 3rd party service such as Feedonomics or Channel Advisor.
- https://shopify.dev/custom-storefronts/internationalization/international-pricing
- https://shopify.dev/api/admin-graphql/2022-01/queries/priceList
- Get the price data via Shopify Product Feeds feature. This is likely the most efficient method to retrieve all product pricing data. For more information see Developer Changelog, Product Feeds, and Unidirectional Product Synchronization
- Get the price data via Shopify storefront API. For more information see Query Product Prices.
-
Get the price data via Shopify Admin API.
-
Option 1:
- Step 1: Get the price ID for each market. For example, CA Price, AU Price etc. See Pricelists API.
- Step 2: Get the localized price for each product, using the price IDs. See Pricelist API
-
Option 2: use the
contextualPricingrequest to retrieve the price for each variant and country combination. For example, replacingProductVariantand country with each request:These queries can be set up as bulk operations which do not count against rate limits but may take significantly longer to complete.
-
Option 1:
- Merchants in PCE countries: You should generate your feeds at 5:00 AM UTC to ensure the daily FX price updates are completed. This configured time may shift to an hour earlier during daylight savings time.
- Merchants in CBS countries: You should generate your feed at 1AM UTC to ensure the updated country FX rate is in Shopify.
- Shopify’s Deep Linking feature: Include a country parameter in your product links (https://help.shopify.com/en/manual/markets/international-domains/directing-customers/deep-links) Example: [https://merchant_url/products/t-shirt?country=DE](https:// https://merchant_url/products/t-shirt?country=DE) [Product page for Germany]
-
Shopify’s subfolder feature. This feature is required if you plan to use the Shopify translation features and requires additional configuration by Global‑e.
Example:
- https://merchant_url/en-de/collections/products/t-shirt [Product page for Germany]
- https://merchant_url/en-ca/collections/products/t-shirt [Product page for Canada]
For headless merchants: Any country-specific URL logic for your Shopping feeds must be implemented by your development team, as the above-documented methods only work for Liquid-based storefronts out of the box. For more information, see the Headless section under Shopping / Marketing Feeds.
Fixed Price Management
Overview
The Fixed Price Management feature lets you manage your local market prices by uploading a file describing the fixed prices for specific products and territories. Note that these prices override Shopify pricelists set via API, ignoring country or currency restrictions. In the past you could only submit new prices to update immediately. Now you can select a date and time for your price submissions to go into effect. The following figure shows the Fixed Price Management screen: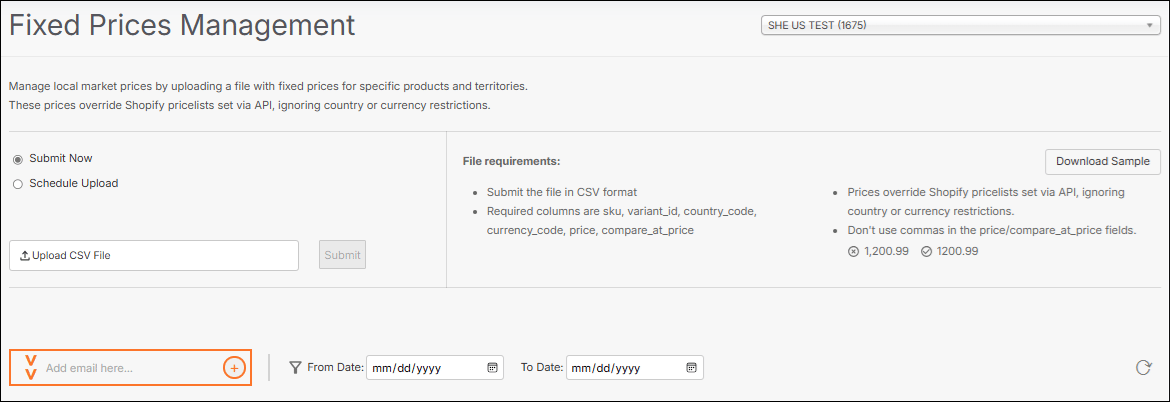
Uploaded File Table
The following figure shows the uploaded file table:
Accessing Fixed Price Management
To access the Fixed Price Management feature- Navigate to Merchants > Product Management > Fixed Price Management from the top menu.
- Select a merchant from merchant menu located at the top of the page.
Setting Up Your Price Sheet
Price sheets you submit must be in CSV format, and you can download a sample CSV format to use as the basis for your submissions by clicking Download Sample. The sample file includes an example and explanation of each value. Price sheets require the following information:Populating Your File
Once you’ve set up your file, you can populate it.Global-e does not support uploading XLS files. Enabling Editing in your CSV file may cause your security settings to change the CSV file format to XLS. Before uploading a file, verify that you’ve saved it in the CSV format.
Including commas in your file will not upload.
- Add a list of products with one product per row.
- Save your file in CSV format.
Submitting Price Sheets
To submit price sheets-
Select one of the following:
- Submit Now – Skip to Step 2.
- Schedule Upload – Set your start date and time.
- Upload your csv file by clicking Upload CSV File.
- Click Submit. The file is added to the table showing all the uploaded price sheets.
- (Optional) If your file fails uploading, resolve the issue and continue with Step 5. See Fixing Validation Errors to identify and resolve the cause of your failed upload.
- Provide an email address.
You can sort the uploaded price sheets by date using the From Date and To Date fields to the right of the email field.
Rescheduling Your Upload Date
You can edit your upload schedule as long as your file in the Ready for upload stage and has not completed uploading. To reschedule your upload date- Click
 located at the far right in a row.
 - Reschedule your upload and click Update.
Cancelling a Publish
You can cancel a publish as long as your file has not completely unloaded. You can do by this by clicking located at the far right in a row.
Reviewing Current Fixed Prices
You can review your current fixed prices by downloading a CSV file containing the current fixed prices. To this, click located near the upper right corner of the table.
Tracking File Status
The Fixed Price Management feature displays the file upload and file validation statuses when you upload your files. This section describes these statuses.File Upload Statuses
The file upload status describes whether your file has uploaded or not, due to an error. The file upload statuses are shown in the table below:
For more information on fixing validation errors, see Fixing Validation Errors.
File Validation Statuses
The file validation status describes whether your file has been validated or not. The file validation statuses are shown in the table below:| Indicator | Status | Description |
|---|---|---|
 | Valid | File validated |
 | Partially Valid | Some validation errors were found |
 | Invalid | No prices were accepted |
Fixing Validation Errors
This section describes the validation errors that may occur when you upload your price lists.Fixed Prices Upload via API
The Upload Fixed Prices API lets you upload your list of fixed prices to Global-e. In addition, you can check the upload status and retrieve the error file.Prerequisites
Prepare your CSV file containing your list of fixed prices and populate it. Each column in your CSV file must have the following headers, respectively:- SKU
- Variant_id
- Country-code
- Price
- Compare_at_price
Authentication: MerchantGUID
To implement API calls with Global-e the only required information is themerchantGUID provided by Global-e.
For authentication, make sure to include your Merchant GUID as part of each call or as part of the header so that Global-e can verify your identity. Make sure to use the appropriate merchantGUID, depending on the Global‑e integration environment used for development or production purposes. See Global-e Environments.
MerchantGUID in URL
Add your MerchantGUID as part of each API URL.
MerchantGUID as part of the header
Add your MerchantGUID as part of the header as illustrated below.
Flow
- Call the UploadFile endpoint to upload your Fixed Prices CSV file to Global-e.
- Call the GetUploadedFileDetails to get the details of the file you uploaded and verify the Upload status.
- Call GetFileWithValidationErrors to retrieve the file containing the errors.
RunId (Global-e ID) is created.
UploadFile
Upload your Fixed Price CSV File to Global-e. MethodURL<Fixed Price CSV File> (from data)
Response
CUrl EXAMPLE:
GetUploadedFileDetails
This endpoint returns the details of the uploaded file, including the upload completion status. PATH: [https://<domain address> /PCE/GetUploadedFileDetails?merchantGUID=<Merchant GUID>&runId=<GUID provided by Upload file endpoint>](https://<domain address> /PCE/GetUploadedFileDetails?merchantGUID=<Merchant GUID>&runId=<GUID provided by Upload file endpoint>) TYPE:GET
RESPONSE:
ERRORS:
GetFileWithValidationErrors
This endpoint always returns a CSV file with the headers. If there are errors, the file contains the rows where errors were identified. PATH: [https://<domain address> /PCE/GetFileWithValidationErrors?merchantGUID=<Merchant GUID>&runId=<GUID provided by Upload file endpoint>](https://<domain address> /PCE/GetFileWithValidationErrors?merchantGUID=<Merchant GUID>&runId=<GUID provided by Upload file endpoint>) TYPE:GET
RESPONSE:
Set up a New Price List
The following procedure details the steps required to set up a new list of fixed prices and upload it to Global‑e.Step 1. Prepare your Price List in CSV Format
In your CSV file, make sure to name the columns headers A through F, as shown below:
Field Descriptions and Requirements
Step 2. Populate your CSV File
When enabling editing in your CSV file, your security settings may change the CSV file format to Excel. Make sure to save your file back to CSV before uploading it to Global-e.
-
Add your list of products, one product per row with the relevant information in the relevant column, according to the Field Descriptions and Requirements detailed in ???.
To ensure optimal accuracy, make sure to use the following values when populating fixed price data in your CSV file.
-
Price per country and currency:
OR (based on
variant_id): -
Price per currency (affects all countries with the same currency):
OR (based on
variant_id):
-
Price per country and currency:
- When done, make sure to save your file as CSV.
Multi-Hubs
Shipping from Multiple Countries using a Single StoreOverview
You can use more hubs in various countries alongside your primary hub. This approach enables faster delivery times to customers and cost reduction for the merchant (Shipping, D&T). You can operate hubs from different Shopify stores, but this only allows a fixed setup (one hub per destination) and adds the overhead of managing multiple stores.Multi Hub Models
The Global-e Multi-hub solution for Shopify allows brands to fulfil orders to Global‑e operated markets from different locations worldwide. The following operational models are supported (depending on brand requirements).Currently, the Shopify routing logic prioritises the location based on the distance between the hub and the customer shipping address. Therefore, currently, orders must ship in their entirety from a single location.
- Operations Countries to be served from each hub Options available for outbound and inbound shipping
- Technical Order routing from checkout decision
- Legal & Finance The Merchant and Global-e both have a local entity or registration in the country Goods are owned by the merchant at the point of sale to Global-e Reconciliation and invoicing between the new contracting parties
Scenarios
Prerequisites
Make sure you have the Shopify new order flow configured. Provide the following information to Global-e:Integration Flow and Responsibilities
This section details the activities that the Merchant and Global-e need to perform to prepare the setup for the feature. To prepare the setup for this feature:-
The Merchant:
- Sets up Shopify locations with product inventory in Shopify.
- Sets up Shipping Profiles in Shopify.
- Sets up Order Routing Rules in Shopify.
- Global-e configures the feature for you on the Global-e side.
- The Merchant and Global-e collaborate to align and address the financial and operational requirements.
Shopify Settings
Set up the Location of Each Hub
Create a location for each local hub. Setup Locations (Settings → Locations)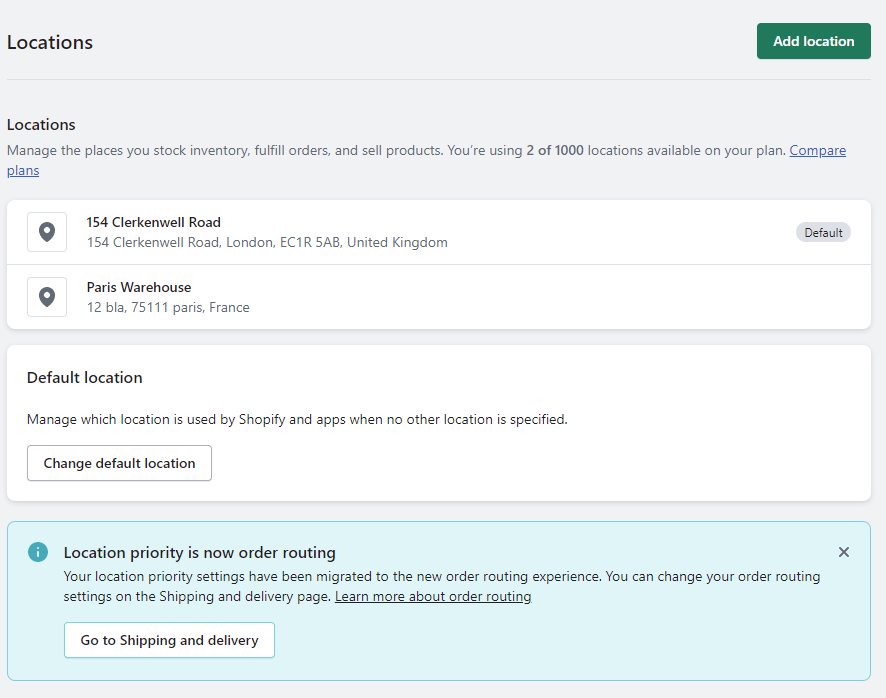
Set up Product Availability in Each Location
Define the stock availability of each product or variant per location. Products → For Each Product Variant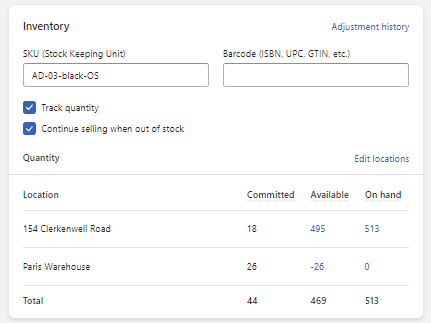

Set up Shipping Profiles
Assign the shipping profile to each location.- Define the markets to be fulfilled from the location
- Rate set a ‘Global-e Carrier Service’ (the relevant shipping services are configured on the Global-e side)
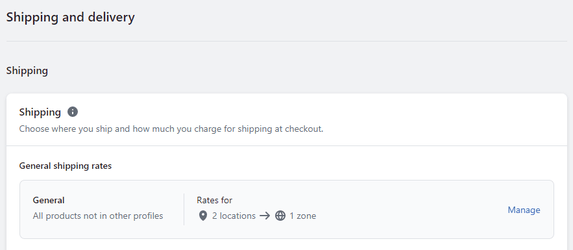
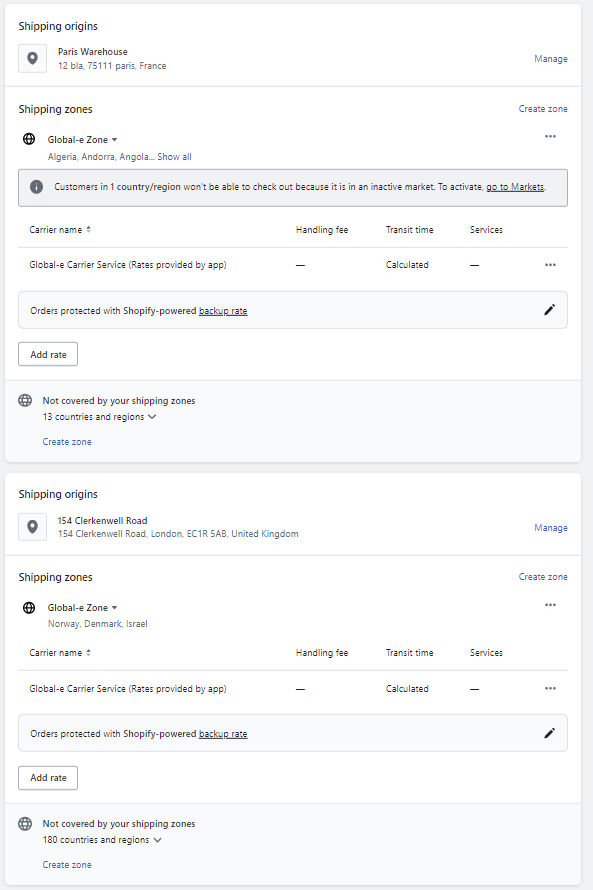
Set up Order Routing Rules
Define the order routing logic for the different locations as configured in your Shopify store, based on the selected operation model (fixed, fallback, or fully dynamic). Note that Global-e can request for this feature to be enabled if it is not already available in your store, Settings → Shipping and delivery → Order routingSince this is still an Early access feature, it requires that Shopify adds it to the merchant store. Shopify documentation: https://help.shopify.com/en/manual/shipping/setting-up-and-managing-your-shipping/order-routing

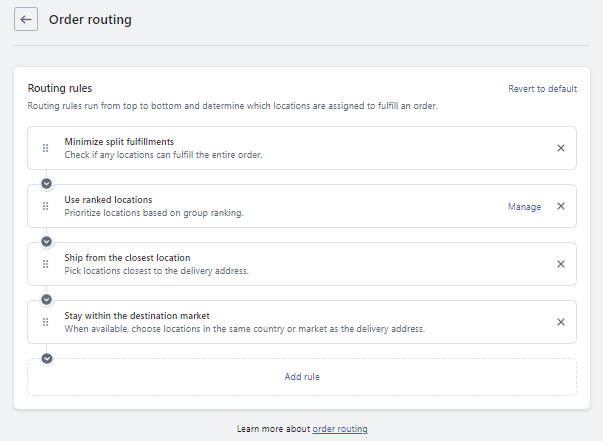
- Select Ship from the closest location OR Stay within the destination market
Set up Stock Availability for Each Hub
To make sure that the Shopify routing logic can decide based on the stock available in each hub, clear the option “Continue selling when out of stock”.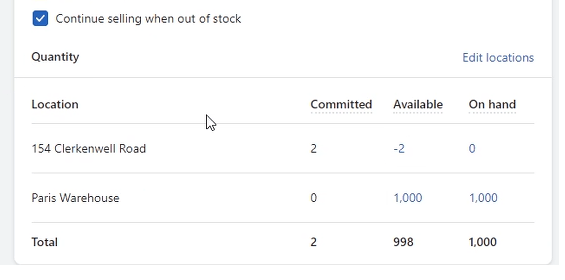
Taxes and Duties
Global-e configures the taxes and duties for Merchants with domestic sales in the US or Canada.Mapping Orders to 3rd Party Systems
Introduction
This guide provides instructions on how to import Global-e orders from Shopify to systems such as an OMS/ERP, WMS or middleware. Key Shopify order data and high-level downstream order flow are illustrated for mapping purposes. If you are currently running live Global‑e’s previous Shopify integration and upgrading to the new version integrated natively into Shopify’s checkout, see Migrating Global‑e to the Native App.Downstream Data Flow from Shopify
Starting with the checkout, international prices, duties & taxes, and shipping methods are calculated by Global‑e.
- Presentment money: This is the currency that the international customer sees on the storefront, cart, checkout, and transactional emails.
-
Shop money: This is the main currency of your Shopify store; this currency is also used for reporting and analytics.
Shop money is what should be mapped downstream by your order management and accounting systems.
- Initial order creation has the payment status PENDING (financial_status property)
- When completed, the payment status gets updated to PAID . You can now submit orders for fulfilment.
For merchants who have configured Shopify to capture payment at fulfilment or manually, the “AUTHORISED” status assigned by Shopify at order validation will be updated automatically to “PAID” by Global-e after a few minutes.
Shopify Order Data
For illustration, this Shopify store is from a US merchant and the storefront currency is based on USD. A single product was purchased. Let’s examine two different order scenarios:- Duties & taxes paid by the customer – the checkout explicitly displays D&T-related line items.
- Duties & taxes inclusive/baked in the product prices – the merchant subsidizes the D&T costs.
Duties & Taxes Paid by the Customer
Market: Israel. The customer pays separately for all the D&T-related costs, including the customs clearance fee (CCF) represented here in the Additional Fee field.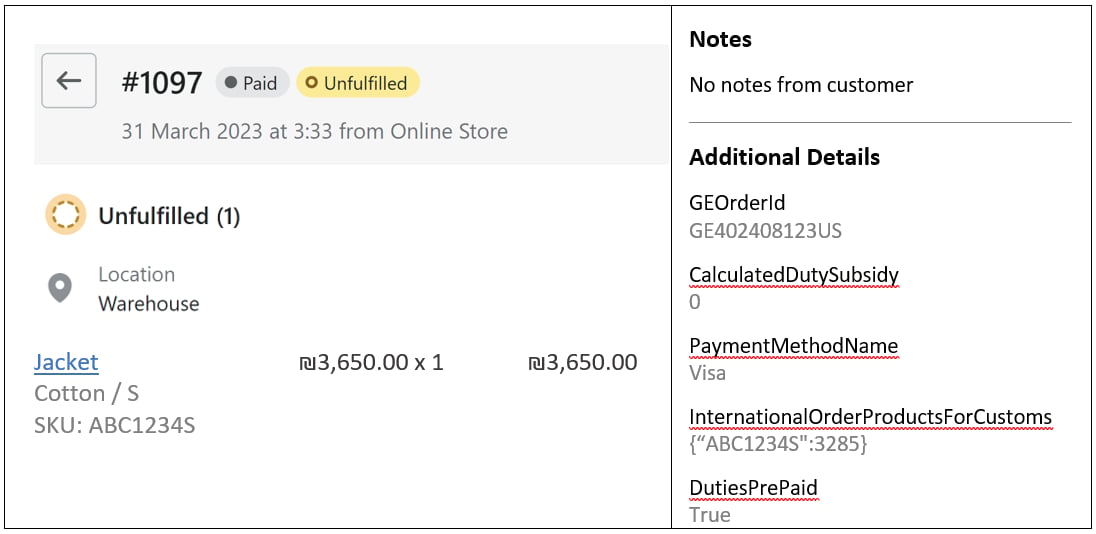
The Additional Details section provides information; it is not required for data consumption.
CalculatedDutySubsidy represents the total order level subsidy in storefront currency. In this example, there is no subsidy for this order, hence the $0.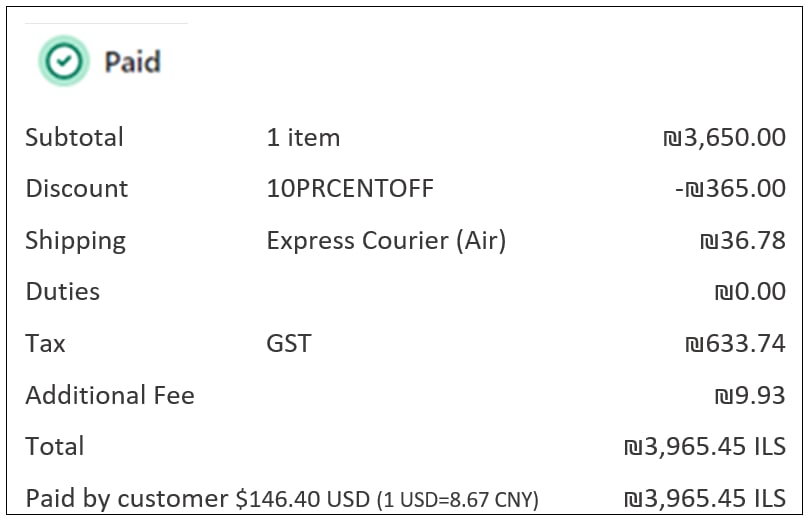
Duties & Taxes Included in the Product Price
Market: United Kingdom. Duties, taxes, and customs clearance fees are all-inclusive in the £500.00 product price in this example.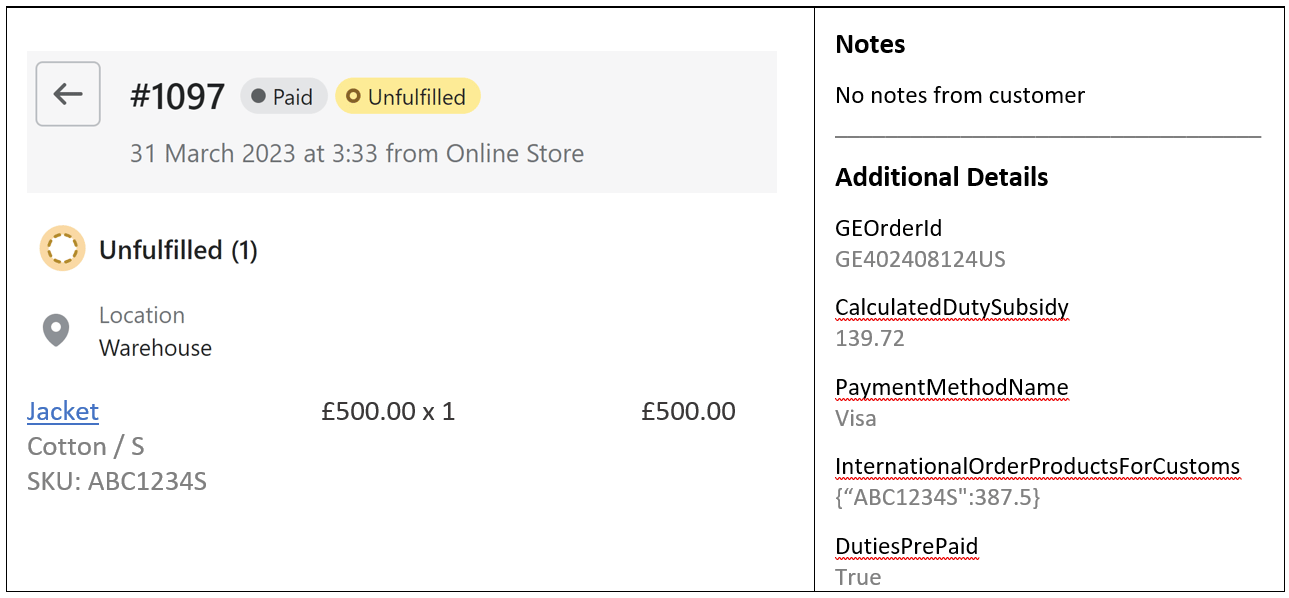
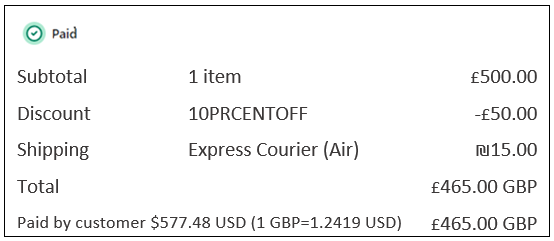
- Duty, tax, and customs clearance fees (CCF) are all part of the overall duties and taxes calculation.
- When a customer’s checkout displays duty & tax-related fees, these costs will appear as order line items.
- Any subsidized costs, whether both duties and taxes or just duty or just taxes – will appear in the note attributes
CalculatedDutySubsidyfield.
Accounting Perspective
From a Shopify view, orders are created per customer B2C transaction with Global‑e. From an accounting perspective, orders should be treated as domestic B2B orders booked against a Global‑e account. You may book any order line items to calculate gross revenue, and of course, bear in mind that Global-e is responsible for handling remittance and filing of local VAT and other taxes in most scenarios. For estimated net revenue, you can subtract theCalculatedDutySubsidy field.
For actual revenue, refer to the Global‑e financial reconciliation report.
Shipping Lines
When the Global-e CrossBorder app gets installed in Shopify, a shipping zone with Global-e operated countries is automatically added. The order shipping line data is standardized by Shopify and cannot be changed.-
Source: fixed value
Global‑e Carrier Service -
Title: For shipping from the US, two possible values only:
Express Courier (Air)orStandard Courier. For other countries, several possible values, depending on the suggested shipping service levels:- Standard Courier
- Express Courier (Air)
- Tracked Post
- Standard Delivery
- Virtual Goods
- Express Courier
- Untracked Post
- Store Collection
- Standard Post
- Express Shipping
- Standard Shipping
- Collection Point
- Tracked Standard
- Express Plus
- Premium Standard
- Tracked Post to Pickup location
-
Code: multiple permutations, depending on the service type.
Notes:
- For services in use for specific stores, contact a Project Manager.
- When shipping from the US, note that only Express Courier (Air) and Standard Courier mappings are applicable.
Migrating Global‑e to the Native App
If you are currently running live on the legacy version of the Global‑e integration with Shopify, a.k.a the “hosted checkout”, you must migrate to the latest version where Global‑e is natively integrated into Shopify’s checkout, as detailed in this section. The key differences for the Shopify order data are as follows:- Order transaction is no longer per B2B transaction in a single currency; instead, it is per customer B2C transaction with presentment currency and shop currency. The B2B VAT is no longer reflected in Shopify.
-
Order id - the Shopify
order_nameno longer starts with ‘GE’ (e.g., GE2034304US). The Order name is now assigned by Shopify as done for domestic orders (e.g., #1234). The Global‑e order id is available. - Shipping lines/code is now standardized by Shopify as explained in the previous section.
- Shipment confirmation emails no longer come from Global‑e; instead, they are managed by Shopify and the merchant.
-
Fraud approval no changes to this flow. This flow is still relying on the payment status
pending(before the fraud check) and a subsequent update topaidstatus upon fraud approval with the addition of an order tagGlobale::Approved. -
Payment gateway no longer shows
globale; instead, it shows:Global‑e Payment (INT)when installing the Global‑e payment method in the sandbox/staging mode.Global‑e Paymentswhen installing the Global‑e payment method in production mode.
note_attribute, which is updated by the Global‑e Shopify app a few seconds after post-order creation.
Example:
Shopify Order JSON Example
Below is an example of an order JSON file. Alternatively, you can download this example from here.End-to-End Order Flow Interfaces
The following figure presents a general illustration of an order flow with Shopify to OMS to WMS and Global‑e.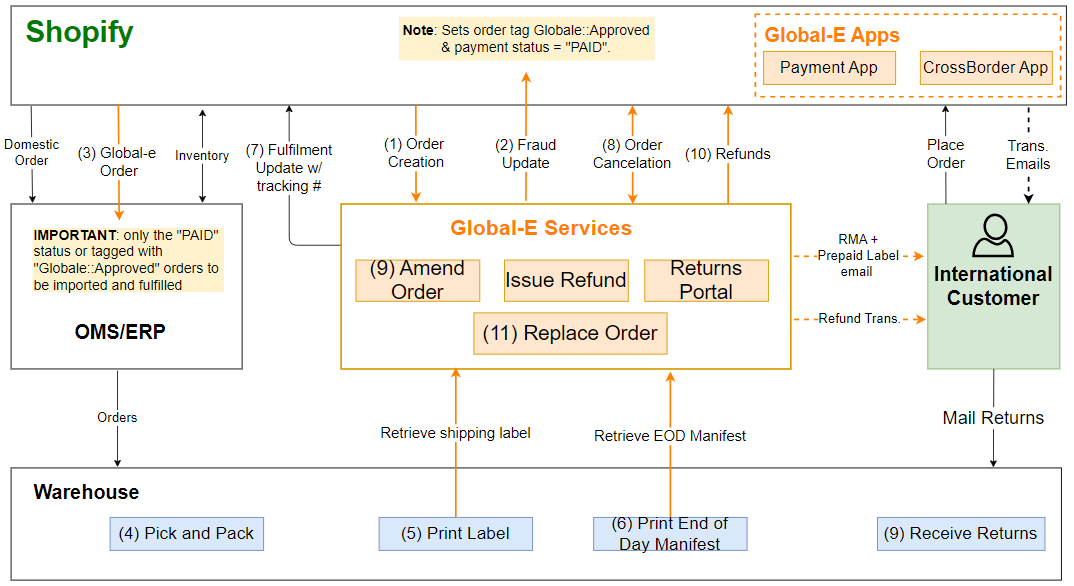
- Order creation: created in Shopify with the initial payment status ‘
PENDING’ and order tagGlobale::Pending. - Fraud check: upon successful fraud check (asynchronous process), the payment status is set to ‘
PAID’ and the order tag is replaced withGlobale::Approved. - Export to OMS/WMS qualified orders: with
PAIDstatus or tagged withGlobale::Approved. - Pick and pack: the warehouse identifies orders via the Shopify order name/number and SKU/UPC.
- Label generation: Global‑e interface provides the final mile carrier label + tracking #
- End-of-day manifest: signals to Global‑e that the order is ready to be dispatched and generates an end-of-day document.
- Fulfilment update to Shopify: in most scenarios, this event or the tracking # itself is provided by Global‑e. It is also expected for Shopify to send the shipment confirmation email when its fulfilment is created.